Sunday, September 2, 2012

Dive Into SHARKS: BIGGEST! LITTLEST!

These fun activities will let you dive into my book SHARKS: BIGGEST! LITTLEST! to investigate some of the world's most fascinating sharks. You'll discover that big or little or having special big or little features is how sharks are just naturally adapted to being a success in their part of the ocean.

Size Matters!

Rearrange the list of sharks in order from the biggest to the very smallest.

Adult Whale Sharks, like this one, can be 45 feet (about 14 meters) long.

Start by looking at the photos and reading the text. For even more clues, check out the map on page 30.
Swell Shark
Cookie-Cutter Shark
Whale Shark
Basking Shark
Port Jackson Horned Shark
Thresher Shark
Ornate Wobbegong Shark
Longnose Sawshark
Spined Pygmy Shark
Great White Shark


Would You Believe?

Can shark skin be used as sandpaper?

Like your teeth and a shark's teeth, denticles have a soft center pulp and a hard enamel coat.
Read pages 12 and 13 to discover a shark's body is covered with little parts called denticles. Search on Google to find out if anyone ever used shark skin for sandpaper in the past.   


Check out this Myth Busters episode to see a test to find out if shark skin will work as sandpaper.


Thanks to all its denticles, this Swell Shark looks like a rough character.  You might be surprised to learn the denticles do more than act like a suit of armor. The shape helps a shark slip move more easily through the water. Sharks also regularly shed and replace denticles just the way they do the teeth in their jaws. As they grow bigger, some kinds of sharks add more little denticles to cover their body. Others replace smaller denticles with larger ones.


A Shark Gave Me The Idea
There are lots of special things about sharks. Check out the follow list.  Then think of something you might invent for people to use based on something special about sharks.
See the nictitating membrane partly covering this blue shark's eye.

  • Some sharks have a special eye membrane, called a nictitating membrane. When the shark gets close to something, such as its prey, this moves over the eye to shield it. Great Whites have a set of muscles that roll the entire eye into its socket to protect it.


  • A shark's nostrils are on the outside of its body and lead into nasal sacs. These aren't for breathing--only smelling.  The sacs are made up of lots of folds of tissues, all packed with scent sensors. No wonder a shark can detect as little as five drops of blood mixed into the amount of water it takes to fill an average swimming pool.

These spiracles are on a zebra shark.

  • What look like freckles on some sharks are the openings of special electricity sensors.  These let the shark detect tiny charges produced by a prey's heartbeats or muscle movements. This lets the shark be particularly sensitive to wounded animals, the easiest prey to catch.


  • A shark can move its upper jaw forward and out to bite. You can only move your lower jaw.
  • A shark's skeleton is entirely cartilage, the rubbery kind of supporting structure you have in your external ear.  That helps sharks in a number of ways. Cartilage is lighter than bone, which helps sharks stay afloat. It's also more flexible than bone, letting sharks make really tight turns.


Shark Tale

Pick one of the sharks you read about in SHARKS: BIGGEST! LITTLEST!.  
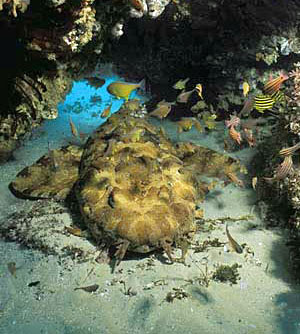
This Ornate Wobegong Shark ambushes its prey using fanglike teeth to snag its prey.

Read the section about that shark again. Next, go on-line to learn more about the life history of the shark you picked.  Then write a short story about a day in the life of that shark. This will be a factional story, a made-up story packed full of real facts.

Look Again!

The pictures in SHARKS: BIGGEST! LITTLEST! have their own stories to tell.  Take another look at the pictures in the book to answer these questions.

Cookie Cutter Shark takes a bite on pages 10 and 11.
A Great White Shark's mouth has five or more rows of teeth. Do all the rows stand up straight or do some of the teeth lie flat?


Do Cooke-Cutter Sharks have lower teeth that are different sizes and shapes or are they all the same size?


Are sharks as big today as during prehistoric times? How do you know?

Which sharks that appear in the book have their mouths at the front end of their head? Which have their mouths under a nose?


Sharks For Good Measure

An adult Great White Shark never stops growing.  So it gets a little longer every year of its life.  They're born alive and about four feet (1.2 meters) long at birth.  One of the biggest kinds of sharks, adults often grow to be 20 feet (6 meters) long. Measure off a piece of string that length. Stretch it out on the floor and lie down next to it with your feet at one end of the string. Set something, like a pencil, across the string next to your head. Now, use a measuring tape to find out how many feet/meters shorter you are than a Great White Shark.

Now, find at least 3 things about the same length as a Great White Shark.  What are they?  Now find out how much longer or shorter each of the following things is compared to a Great White Shark.

  • The class's two tallest students lying head to feet on the floor
  • Your school's librarian
  • The length of the school principal's car.
While you're measuring, here's some cool facts you'll enjoy learning about Great White Sharks:
Mother sharks give birth to as many as 60 babies at one time. The babies are on their own immediately after they're born.

Great White Sharks swim very fast compared to other sharks. They've been clocked swimming as fast as 40 miles per hour. But they can never stop swimming. They sink if they stop moving. Their bodies also aren't designed to let them swim backwards. So they can't backed up.


More Action
Read page 24 to learn more about this hatching baby Swell Shark.
Visit the following websites to keep on investigating sharks.


Tuesday, August 14, 2012

WHAT HAPPENS NEXT?

There's nothing more fun than figuring out the answer to this question. "What will happen next?"


To do that you need to be on the lookout for clues, including ones that are not obvious at first glance.  You also need to check for patterns--something that's happening just the way you've experienced in the past.
Then you can imagine all of the possible things that could happen next and predict what's most likely to happen.

So what happens next?  Here are three different problems for you to tackle. As you do you'll also discover some amazing things about animals, the world--you're even likely to discover some surprising things about yourself.

Who's Faster?


Check out this grizzly bear going nose to nose with a salmon. What do you think will happen next.

What could the bear do to catch the fish?

How could the fish escape?

Brainstorm.  Think of at least three things that could happen next based on what you've seen or read about grizzlies and salmon.

When you decide what is most likely to happen next, go down to ANSWER 1. There you'll see what did happen next.


What Change Will This Cause?


See the jet of fire.

It's shooting into the mouth of a huge cloth bag, heating the air that's trapped inside.

Will the heated air sink, blowing out the fire?

Or will the heated air rise, lifting the cloth bag?

You may not know what happens to air when it's heated. If that's the case, you need to observe that to be able to predict what happens next.


Of course, you could ask someone what happens to air when it's heated. Or you could look it up on-line.  It's more fun to see for yourself, though.


So put a rubber balloon over the top of a clean, empty glass soda bottle.  

Set the bottle in a saucepan and add a measuring cup full of water.  

Have an adult partner turn the heat on the stove to medium. 

Watch what happens as the water around the bottle gets hot and the air inside the bottle heats up, too.

The balloon fills and lifts. That's because everything is made up of tiny building blocks called molecules. In cool air, the molecules are slow-moving and close together. As the air warms up, the molecules move faster, bump into each other, and spread apart. As the warm air takes up more room inside the bottle, it rises where it's trapped by the balloon. Then the balloon partly inflates.

Now, use what you've observed to predict what's likely to happen to the huge cloth bag when fire shoots into it.  To check what does happen next, scroll down to ANSWER 2.

What's Likely To Happen?


Mother raccoon walked out on a branch, looking for food in the lake. Her baby stayed on the log. Then eager to grab a tasty treat, the young raccoon leaned forward and stretched out a paw. 

What do you think will happen to the young raccoon? 

A good way to to figure that out is to imagine yourself in a similar situation.  When you decide what is most likely to happen go to ANSWER 3. You'll see what did happen next.


Answer 1--Who's Faster?


Did you figure out that to catch the fish the bear has to open its mouth and thrust it head forward?

To keep from being caught, the fish has to wiggle sideways and dive back into the water.

 This time the bear reacted faster and caught a fish dinner.


So how's your reaction time?

To test it, have a partner hold a ruler at the top with zero end down.

Hold onto the ruler so your thumb is close to the zero.

Next, open your grip so your fingers are no longer touching the ruler and stay alert.

Your partner will suddenly release the ruler.

Grab it.

Then look to see which number is under your thumb. The lower the number, the faster you were able to react.

Repeat this test two more time.

Does your reaction time improve with practice?  Switch and test your partner's reaction time.

Now, design another activity to measure your reaction time. Check with an adult to be sure what you've planned will be safe for you to do.

Answer 2--What's the Result?


When the air inside the big cloth bag heats up and rises, the bag inflates. Now it's a hot air balloon  Because the hot air inside the balloon is lighter than the cool air around it, the balloon floats up into the sky.  The balloon's pilot must keep on firing the jet every few minutes, though.

If the pilot doesn't do this what do you think will happen as the air inside the big cloth bag cools?  If you aren't sure pour some cool water into the pan.  Then watch what happens to the inflated balloon as the air inside the bottle cools.

Answer 3--What's Likely to Happen?


Did remembering your past experience let you guess the young raccoon lost its balance?

Objects, animals, and you stay balanced as long as they can maintain their position without tipping.  When so much of the young raccoon's weight was shifted ahead of the log, it slipped into the lake.

This experience will help the youngster do a better job of tackling similar situations in the future.


So do you have any special body part to help you judge when you're balanced? Yes, you do.


These are the semicircular canals in your inner ear.

When you move or tip your head, the fluid inside the canals moves.  At one point in the tube, there is a gelatin-like dam with tiny sensors. When the moving fluid pushes on the dam, the sensors send signals to your brain. And when your brain figures out these messages--something that happens almost instantly--you realize you're moving.

If, like this girl, you spin around and stop suddenly you feel like you're still spinning. That's because for an instant after you stop, the fluid in the tubes in your ear keeps on moving and sending signals to your brain. That can make you feel unbalanced.


ONE MORE CHALLENGE


Will the fish be able to gulp in the frog? Or is a frog quick enough in the water to be likely to escape? Take a close look at what's going on in the photo.  Think about patterns of behavior.  What's the fish likely to be capable of doing?  What's the frog likely to be able to do?  What's probably happened in such a situation in the past.  Imagine yourself in the frog's place and think what your next move might be.  Now imagine yourself in the fish's place.  

Predict what's most likely to happen next.  Tell why you made that decision.


Thursday, July 5, 2012

BRAINSTORMING Basic Training


Learning isn't just memorizing facts. It's discovering how to brainstorm and how to use that skill to solve problems.  So before kids tackle anything else they need brainstorming basic training.  Here it is in five fun, action-packed steps. 

*Teachers, this is just what your students need to get ready for "Next Generation of Science Standards"(NGSS) based skill-building. 

1.  Creative Observing  Children will power up their observational skills to collect as much information as possible.  It's what they'll need to do when getting ready to creatively tackle any problem.


Follow the recipe below to mix up a batch of some really cool stuff. I call it "Goop".  Then check it out!

Recipe for Goop 


Pour one cup of cornstarch into a shallow container, like a plastic storage box.

Add two to four drops of green food coloring.

Use a metal spoon to slowly stir in water, adding just a few tablespoons at a time, until the Goop feels solid when poke.


Now, find out everything you can about Goop.  Examine it in every way you can think of.

Then test Goop in each of these ways and observe closely:


  • Try to pour it into an empty container.
  • Try to make it change its shape. Try to mold it into a ball. Try to shape it into a cube.
  • Poke it with a finger. Decide how it feels.
  • Try to break it into two chunks. Can you? How does this change it? Take a close look at the edges of the broken pieces.
  • Try to put the two chunks back together. Was it easy to do?


NOTE: When you're finished, throw the Goop away in the trash basket. Do not wash it down the sink as it can clog pipes.


2.  Brainstorming  Kids will be revving their brains with this one and learning what problem solving is like in real life.


Read the following story aloud. Then have children work individually or in small groups to think of all the possible solutions to the problem. Add to the fun by challenging them to come up with a solution in just one minute.


Story: The angry native are hot on Smitty's trail.  A heavy, sharp-tipped spear zips past his head and thumps into a tree trunk. He ducks and swerves off the trail and into the thick underbrush. Shoving leaves out of his way, Smitty charges through the jungle.  Suddenly, Smitty jerks to a stop on the bank of a river. Water is roaring and churning around huge boulders that poke up like humps on a sea serpent's back. He's also pretty sure there's a crocodile lurking on the far bank. However, if he could just get across the river, the natives would probably let him go.  How can Smitty get across the river?


After one minute, challenge kids to brainstorm even harder by thinking about things that might keep some of these possible escapes from working. Then challenge them to pick Smitty's best possible escape option and tell why they believe it will work.


3.  Creative Predicting  Now it's time to make use of patterns. Children will discover how important it is to look for patterns and remember them.  


Mystery Bag

Prepare for this by placing something familiar such as popped popcorn, paperclips, or M&M candies in a paper bag and staple the top shut.

Next, divide the class into small groups.  Give each group a bag. Challenge them to use their senses one at a time to collect information about what's in the bag. After each observation, challenge them to use their past experiences and these observations to try and identify the mystery object.

Have the children use their sense of hearing first.  Have them shake the bag and listen.

Next, have children gently poke and squeeze the bag. What do they observe this time? Does that make them want to change their earlier prediction about what's inside the bag? If so, what do they now think the mystery item might be?

Challenge children to use their sense of smell this time and repeat the process.  They'll need to make observations, consider what they may have smelled in the past that had that scent, and decide if they want to change their prediction.

Finally, allow children to open the bag and use their sense of sight to collect observations and identify the mystery object.


A Kitchen Mystery

This is another fun active to get kids observing, inferring, and predicting.  Give each group a different kitchen tool and challenge them to figure out what problem that tool was designed to solve.  The weirder the tool the better for this activity.  Allow time for the groups to combine their brainpower on this.  Then let each group display their kitchen tool, tell what use they predict it has, and explain why they came to this conclusion.  Encourage all of the groups to discuss whether or not this is the most likely function of each tool before you share the real use.

4.  Experimenting  Kids will be challenged to predict and test.  It's fun now and will be a survival skill for the life.


Prepare for this activity by having partner groups fold paper airplanes. Have each group complete their plane by slipping a paperclip over the nose (narrow) end.

Use tape on the floor on a long hall or a piece of rope outdoors on the playground to be a starting line. Have the partner groups toss their plane and measure how far it flies.


Then challenge the partners to change their plane so it will fly even farther.

Before they leap into action, have the partners list all the changes they could make.

Next, have them list the three changes that (based on past experiences and observing patterns) they think are most likely to be successful. Have them narrow this down to the one change they believe is likely to work best.  Be sure they list why they think this will work.

Have the partners also think about what variables (things that could change the outcome) they need to keep exactly the same as they test their modified plane.

Finally, have the partners change their plane per their idea and test it three times.

Did it work?  Could something be changed to make fly even farther? If so, what?

Have all of the groups compare their results and decide which modification worked best. Why did it?

5.  Creative Evaluating  Children will analyze results and think of other possibilities. They'll be pushing their brains into maximum action now!


New Shoe

It's time for an activity that will take kids from creative thinking to inventing.  Divide the class into partner groups again.  This time have them examine a tennis shoe.

Challenge them to list everything about the shoe that makes it good for the job it was made to do.

Have them think how this tennis shoe could be changed to function even better.

Next, have the partners come up with new features that might be added to the shoe to make it perform even better or do something that's totally new and wonderful.  Encourage them to make diagrams of the shoe showing their proposed changes.

Have each partner group describe the new and improved features they're proposing.  If you have old tennis shoes available, you could let the partners collect materials and create a prototype model of their proposed improved shoe.

Wednesday, April 11, 2012

SCIENCE MAGIC!! Share The Action

I've recently been sharing virtual Skype visits with schools. Part of my visit is a science magic show so I've been getting requests to share my secrets. I'm happy to do that because the truth is that discovering how the world works is the real magic--and what science is all about. So here goes. Follow the steps for each activity and you can make science magic too. Just be sure to check with an adult before you start. Even better ask an adult to be your partner and have fun exploring science magic together.

Make Air Pressure Hold A Plate


This could get messy so work over a sink. Even better try this outdoors.

You'll need:
A study plastic plate
A paper towel
A sturdy plastic glass (juice size works best)

Fill the plastic glass nearly full of water. Fold the paper towel into fourths and place it on the middle of the plate. Next, turn the plate and towel over the cup like a lid. Hold the plate against the top of the cup with your fingers while you turn the whole system over.

Now the glass is on top. Be sure it is straight up and down. Hold on to the cup with the hand that isn't pressing up on the plate. Then--slowly--take your hand away from the plate. The plate won't fall and the water will stay inside the glass.

Air pressure makes this work. Even though it's invisible, air has weight and takes up space. Air is also al around you so it exerts force on you and objects and other people from all directions. As gravity pulls down on the water inside the glass a partial vacuum is created in the air-filled space inside the glass. Now the downward force of the water and air inside the glass is less than all the upward pushing force of air on the plate. You can see how much larger this surface is than that covered by the water inside the glass. The wet paper towel helps by making a tight seal between the glass and the plate. This keeps any air from slipping inside the glass. If that happened, the air rushing into the glass would push the water out. Then there would be a flood and you'd get wet.


You'll need:
an empty 1 or 2 liter plastic soft drink bottle with a screw-on cap.
3 pushpins (the kind used to display things on a bulletin board)

Work outdoors or at the sink. Fill the bottle to the very top with water. Screw on the cap, making sure it's tightly sealed.

Next, stick the pushpins into the bottle, one at a time. Then have your adult partner hold the bottle by its cap while you carefully twist and tug out the pushpins.

Surprise! If water leaks out at all, it quickly stops or slows to a tiny trickle.


Did the bottle magically plug the holes? Of course not. Squeeze the bottle to prove it. Water will spurt out the holes. But when you stop squeezing the water will immediately stop flowing.

The magic is that air pressure is at work again. Air doesn't simply push down, it exerts force in all directions. The force of the air pushing in on the water at the holes you made is greater than that of the water inside the bottle pushing out.

What do you think will happen when you take the cap off the bottle, letting air push down on the water inside the bottle? Try it--just be sure the bottle is over the sink.

Make Air Vibrate and Create Squawky Cans

Want to make strange sounds? You can with a little help from science.


You'll Need:
two cans of different sizes (cleaned and dried)
Sturdy packaging twine
2 paperclips
scissors
tape
a piece of clean sponge (about 1 inch by 2 inches)

Have an adult partner use a nail and hammer to punch a hole through the bottom of each can. The hole should be just big enough for the twine to slip through.

Next, cut a piece of twine about twice as long as the can's height. Thread one end of the twine through the hole and tie to a paper clip. Rest the paper clip on the can bottom and tape in place. Repeat these steps with the second can.

Now, wet the sponge and squeeze out the water.

To make your can squawk, hold the can in one hand. With the other hand, pinch the sponge against the string and give it a jerk. This makes the metal-can bottom vibrate. That in turn creates waves of air. When those waves reach your ear and your brain interprets the signals it hears, you hear the spooky noises.

Can you think of some other things you could make vibrate to produce squawks and weird noises? You'll probably think of lots more but here are three to get you started:

A balloon--Blow it up and grip it between your legs so you can use both hands to stretch its neck Then control how much air escapes.

A comb--Hold it in one hand and run your fingernail back and forth across its teeth.

An empty glass soda bottle--Put the rim next to your lower lip and blow a strong blast of air across the opening.

Use Fast Moving Air to Float A Ball In Mid-Air


A blowdryer makes this science magic trick happen.

You'll need:
A blow-dryer
A Ping-Pong ball

Hold the blow-dryer with the nozzle aimed straight up. You may want your adult partner to do that for you. When the dryer is switched on to "high", place the ball in this column of fast-moving air so it's about 5 inches above the nozzle. Let go of the ball and quickly take your hand away.

As long as the air current iss shooting striaght up, the Ping-Pong ball will float suspended above the dryer's nozzle.

This "magic" happens because fast-moving air has less pressure than more slowly moving air. So the Ping-Pong ball is trapped inside the column of fast-moving air. Here the ball is pushed upward by a jet of air with enough force to keep it from falling, but not enough to blow it any higher.

What you've discovered is also the basic law of nature that helps airplanes fly. When viewed on edge the upper surface of an airplane's wing is curved and the lower surface is flat. Air slips over a curved surface more quickly than it does over a flat surface. So there is less air pressure on the upper surface of the wing than there is beneath the wing, giving the airplane lift.

Can you guess why airplanes take off into the wind?


Sunday, March 11, 2012

DON'T THROW OUT THE TRASH!


It can be a lot of fun to help keep the earth healthy. One way you can help is by taking a second look at everything you think is trash. Maybe instead of sending it off to a landfill, your trash can become art, a toy, or something to help your local wildlife. Here are some ideas to get you started. You'll definitely discover that recycling and using up things instead of throwing them out can be FUN!


From What Happens Next: 2 by Sandra Markle (Longstreet Press, 1996).
Turn Old Newspapers into A Birdhouse

Just follow these steps and birds will soon be moving in. First, blow up a balloon and tie the neck. In a plastic bowl (or a milk jug with the top half cut off) mix a half cup white glue with a half cup of water.

Use scissors to cut strips of newspaper about 2 inches wide. Start with about 50 strips.


Check with an adult to see where it's okay for you to work because the next step is going to be messy. And definitely wear old clothes. Then, one-by-one dip strips of newspaper into the glue, wipe off any excess by squeezing between your fingers, and press the strip smoothly onto the balloon. You'll need to cover all of the balloon, including the neck so you may need to take time out to wash up and cut more paper strips. Let the balloon dry completely. Then repeat. Do this until you've built up four layers covering the balloon.

Now, find out what small birds commonly live in birdhouses in your area. Check on-line or in bird books to find out what diameter hole you'll need to have in your birdhouse for your local guests to move in. Have your adult partner use a utility knife to cut a door that's just the right diameter about 3 to 4 inches above the bottom. That will pop the balloon. So remove the balloon pieces from the inside. Then have your adult partner do one more thing.

Working outdoors, have your adult partner spray a coating of water-based enamel inside the house. (This paint is available at home supply stores). This will help make the house waterproof. Dr. Mimi Shepherd, an avian veterinarian, reports water-based enamel is safe for birds once it's been allowed to dry for several days).

Also have your partner use pointed scissors to drill three drainage holes in the round bottom of the birdhouse. And they'll need to attach a toggle bolt to the pointed end and twist on a wire loop to hang the birdhouse.

Finally, back indoors you can use a paintbrush and acrylic paint to decorate the outside of the birdhouse. Top that with a coat of varnish to make the house waterproof.


From Exploring Winter by Sandra Markle (Atheneum, 1984)
Make A Bottle Diner For Birds

Invite the birds to your house for dinner. To make this bird feeder, you'll need a two liter soft drink bottle with a screw on cap, ball point pen, scissors, string, three wire garbage bag ties (or pipe cleaners), and an aluminum pie plate.

Cut off the bottom of the bottle. Set it on the middle of the pie pan and draw around it.

Cut four large scallops along the cut off edge of the bottle. This will allow a flow of bird seed.

Poke holes in the pan on two opposite sides of the circle you drew.

Poke holes in two opposite sides of the bottle.

Attach the bottle to the pan with the ties. Twist the third tie to each of the other two ties on the bottom of the pan. This will securely anchor the bottle to the pan.

Cut off a piece of string 18 to 36 inches long. Poke two holes in the neck of the bottle. Loop the string through the holes and tie the ends in a knot. That will form a loop you can use to hang the bird feeder.
Pour seed into the bottle through the bottle mouth until the feeder is about half full. Put the cap on the bottle.

Once your bottle bird feeder is ready, ask an adult to hang it in a tree or somewhere you can easily watch from a window. You'll also need your adult partner to help you add seed to the bottle feeder as needed. Once you begin to feed the birds, they will depend on you to keep the food coming. If the weather gets cold and snowy in the winter where you live, your bird feeder may be the best diner in the area.

As you watch your bird feeder, see if you can discover the answers to these questions:

  • What time of day do the birds most often come to eat?
  • Do the birds come more or less often if the weather is stormy?
  • Do the birds usually feed one at a time or in groups?
  • Which birds chase others away? (You may need to search on-line or in bird books to identify the birds that come to your feeder.)

From What Happens Next: 2 by Sandra Markle (Longstreet Press, 1996).

Shoot Water Blasters
You can turn empty plastic bottles with screw-on caps, such as water or soft drink bottles, into a kind of squirt gun--a water blaster.

First, take the cap off the bottle. Have an adult partner help you put a hole in the center of this cap. Using an oven mitt, they'll need to hold the tip of a slim steel nail (a fourpenny nail) in a candle flame for about ten seconds. Then, working over a stack of old magazines, they'll need to immediately press the hot nail tip straight down on the center of the inside of the cap. That will make a small hole in the cap.

Then you can fill the bottle with water and screw on the cap to create your Water Blaster. Take your Water Blaster outdoors and squeeze to fire. Refill as needed. Build up your blasting skills by aiming at plastic cups set on something that is about waist high.


  • How far away can you be and still strike your target?
  • Does the amount of water in the Water Blaster make a difference to its blast power?


From The Kids' Earth Handbook by Sandra Markle (Atheneum, 1991)
Play A Game of Jug Ball

This game will turn empty milk jugs into a great game. Collect six milk jugs and rinse them out. Use scissors to cut the body of the jug, transforming it into a scoop (like the one in the picture). Next create a ball. Use an old dishwashing sponge. Dampen it so it's bendable. Bend it in half and anchor this shape with several recycled rubber bands.

Now, to play jug ball, stand in a circle. Stand close together. Then take three steps back. Toss the sponge ball from player to player. Start by going around the cirlce. Then have the player doing the tossing call the name of the player who must catch the ball. Any player who fails to catch the ball collects one letter of the word "Oops." When all four letters are collected by the same person, he or she must drop out of the game. The winner is the person remaining when everyone else has spelled "Oops."


Just remember, for the earth's sake,
conserve, recycle, and use it up!

Sunday, March 4, 2012

PLAY BALL!


Spring isn't far away and with that comes BASEBALL.  So here's a bunch of activities to get you ready to throw out the first ball of the season.

Do Cold Balls Bounce Less?


In 1965, the Detroit Tigers accused the Chicago White Sox of refrigerating the balls used by their pitchers.  Should a team care if their batters are pitched ice-cold balls?  You can find out.

Slip at least three baseballs  (five is even better) into a plastic grocery sack to keep things clean and chill them in a refrigerator for an hour.  While you're waiting think about how chilling changes other things, like pancake syrup or butter.  Then conduct this test to find out the cold facts.


Work outdoors on a paved area or indoors on a smooth, hard surface (after checking with an adult). Have someone hold a measuring stick straight up with the starting end of the scale on the floor.  Drop the balls one at a time from the top of the stick.  Be sure someone is watching closely to check exactly how high each ball bounces.  Write down each ball's bounce height. Divide by the number of balls tested to find the average bounce height.

Next, spend five minutes warming up the balls using anyway you can think of to do the job safely, such as holding the balls in warm hands or even setting them on a hot water bottle.

Then repeat the bounce test with the warmed balls.

Were the warm balls better bouncers?  They should be.  

How far a baseball travels when a batter strikes it depends on two things: the amount of energy transferred to the ball by the bat and how quickly the elastic material making up the ball snaps back, pushing away from the bat.  When a bat strikes a ball, it compresses the baseball to about one half of its original diameter. Wow! Think about that the next time you watch a batter connect with a ball.


For all those inquiring minds who'd like to know how this historic event effected the game, here's the rest of the story.  Before this event, Major League home teams used to supply game balls to the umpire one at a time throughout the game. So the home team's pitchers could be given chilled balls. Worse, according to the White Sox, the Tigers baked the balls given to their team's pitchers. That meant the Tigers were slugging hot balls.  To end the squabble, today, Major League rules require the home team to supply all the baseballs to be used during the game two hours before game time.

The Balls Have Changed--But Not Much
In the past 100 years, baseballs have only changed in one way. In 1974, cowhide replaced horsehide as the baseball's covering.  Otherwise a baseball is exactly the same, today, as it always was.

There's a cork core inside a rubber ball surrounded by nearly a quarter mile of woolen yarn, a winding of cotton/polyester yarn and a leather jacket sealed with 108 stitches (not one more or one less).

The finished ball must weigh between 5 and 5.25 ounces (141 and 148 grams) and be between 9 and 9.25 inches (22 and 24 centimeters) around.
This CT-scan lets you peek inside a real baseball to see its parts.
Don't you love the unique way technology lets us look at things?


Find The Sweet Spot


You'll need a wooden bat and a hammer (either a real hammer or a wooden mallet) for this activity.  Your job is to find the one special spot on the baseball called the sweet spot.  It has that name because striking a baseball with exactly that spot on the bat will make it travel farther than striking it at any other point.  That happens because striking the ball at the sweet spot causes the least amount of vibration within the wooden bat.  And that means the greatest amount of energy will be transferred to the ball.  So where is the sweet spot?

Have a partner grab the end of the bat's handle and let the bat hang straight down. Use the hammer to tap the bat gently near its fat free end.  Then repeat tapping the bat gently at points closer and closer to the handle.  Usually striking the bat at the sweet spot will produce a slightly different sound.  The person holding the bat should also feel less vibrations when the bat is struck at the sweet spot.


To be precise, measure about six inches (15 centimeters) up from the fat end of the bat.  That's where the sweet spot is usually located.

When a Major League player strikes the ball at that
spot, it's not uncommon for the ball to leave the bat
traveling 100 miles (160 kilometers) per hour.


In the past, Major League ballplayers tried to make balls travel farther by swinging heavy bats.  Home run hitting king Babe Ruth regularly used a 42 ounce (1,190-gram) bat. Sometimes, he even used one that weighed 52 ounces (1,474 grams).


Today, though, players have decided they can knock balls farther by swinging faster. So they are opting to use lighter bats--ones weighing 32 or even 28 ounces (907 or 793 grams).


Play the Original Game

This is a photograph of a game of rounders being played in 1913.

Before there was baseball, people in England played a game called rounders.  Follow these directions, to play a game of rounders. Then decide how it's similar to today's game of baseball. And how it's different.

To play rounders, first vote on how many players to have on a team--any number will do.  It's not even necessary for the two competing teams to have the same number of players.

Next, vote on whether to have three or five bases.  Once outdoors, space out the bases in a circle. They can be as close together or as far apart as you choose. The pitcher will stand in the center of this circle. The batter from the opposite team will stand at one of the bases. The other players on the pitcher's team will be in the field to try and catch the batted ball and tag the batter before he circles the bases.

Now, play ball.  Each player gets only one chance at bat.  The winning team is the one with the most players to have rounded all the bases.  By the way, in the original game, runners weren't tagged out. They had to actually be struck with a ball tossed at them.

You might be interested in knowing that in the very early days of baseball, players were given four strikes before they struck out.


Check out these websites for even more baseball fun.

The Baseball Hall of Fame   Great information about the Hall of Fame players, trivia about baseball, and Frequently Asked Questions about the game.

Black Baseball League  A place to explore the period of baseball's history when black players had their own league.

Atlanta Braves  A site to find tips from pros, interviews with players and much more. I shared this team's site because I lived in Atlanta for many years and still cheer for the team.  However, you can find information about your own favorite team at MLB.com

Monday, February 6, 2012

Waiting For Ice--The Inside Story


Waiting For Ice (Charlesbridge) actually started, as many of my books do, while I was doing research for another book and--WHOA!--I discovered a special story.


I live and write by the rule that 99.9 percent of my research information must come directly from experts who are working firsthand on the subject.  That sometimes takes me to very interesting places, like the South Pole.  Or, at the very least, it lets me talk with experts on the phone--sometimes via satellite while they're in remote places.


So while writing Animal Predators: Polar Bears (Lerner),
I had the chance to talk to Dr. Nikita Ovsyanikov.


 Since 1990, he's spent every Arctic summer on Wrangel Island, studying polar bears.  That's no easy task. Let me set the scene for you.


This is an aerial view of Wrangel Island during the summer and during the winter. 

Wrangel Island in winter.

Wrangel Island in summe
It's never an easy place to live. The island is North of the Arctic Circle.  It's a rugged, windswept, storm-scoured island about half the size of Rhode Island surrounded by frigid seas and miles from anywhere people would find comfortable.


It's no wonder the island has features with such names as Unexpected River and Doubtful Spit.  Check out this website to find out more about Wrangel Island.


So why go there to study polar bears? It's because that's the place hundreds of polars bears are stranded every summer.  All winter long, polar bears roam solo or a mother travels with her cubs. The bears take advantage of icebergs and raft-like ice floes to rest in between hunting seals, beluga whales, and other sea creatures.  Polar bears are good swimmers, but they can't swim indefinitely. So when the sea ice melts, they haul out.  They're stuck wherever they land until, once again, the sea crusts over with ice.  Because Wrangel Island is one of the few available land masses in prime polar bear territory, as many as 600 bears are stranded there every summer.

Imagine the fights that break out as the bears compete for wind-sheltered resting spots and food.  Finding something to eat isn't a big problem while the island is also home to colonies of migratory birds, such as black bellied plovers and red knots, raising their young or walruses stopping by to rest.  However, those animals leave around September.


Normally the sea ice returns in September so the polar bears leave the island about the same time as their prey.  However,  global warming has delayed sea ice formation to as late as November.  Then the polar bears are trapped, waiting for ice.  Eventually, the only food source on the island is scraps, like the remains of a whale that washed ashore and dead birds.


Nikita shared the amazing story of what happened in 2002, a year when the polar bears had to wait until well into November for the sea ice to return.   He said, "One day, I spotted two young cubs alone on a narrow spit of land.  The cubs were small, undoubtedly only born that year, but no mother bear arrived to feed or protect them."

Nikita watched the cubs on the spit for six days. Each day, they screamed for their mother, paced nervously, and bravely lunged to drive away adult bears that came too close. The mother bear never returned, though.  On the sixth day, Nikita discovered there was only a single cub, a young female, stood alone on the spit.  Adult polar bears will attack and kill orphaned bears so Nikita guessed that's what happened to the one cub.  He also worried what might happen to the survivor.


The orphaned cub left the spit and Nikita searched for it each day as he studied the polar bears.  He watched her bravely fend off attacks from adult bears and steal a few bites of dried walrus skin.  One day, she managed to get a dead bird all for herself.  Seeing her fight to stay alive, Nikita nicknamed the cub Tuff.  Watching Tuff became his favorite past time.  Then one day Tuff surprised him by coming to the cabin where he lived on the island. His rule was to only watch the animals, but when he caught Tuff peering longingly into the window of the storage room where he kept his supply of reindeer meat his heart melted.

Nikita said, "To me it was like watching a child suffer.  I couldn't do it. I thought I'd give her a few happy moments in what would surely be a very short life."

 Then he kept on feeding her from time to time because the sea remained ice free that year until 
well into November. 


When the ice finally returned. Nikita packed up to head home too. The day before he left,  he gave Tuff a farewell gift--a whole reindeer carcass.  So she ate and ate.  Then, very full, Tuff waddled out onto the ice, lay down, and fell asleep.


In the morning, Nikita looked for Tuff one last time but couldn't find her. Because the ice was broken up, he guessed Tuff must have ridden out to sea aboard a floating ice raft.  He was sure that was the last he'd ever see of the polar bear cub.  What chance could she possibly have of making it through the winter without a mother to teach her to hunt or to catch food for her.


What a shock he had, when he came back to Wrangel Island that next summer. 

He'd barely settled in when a young adult polar bear plodded up to his cabin.  Nikita said, "I'd spent so many hours looking her in the face and taking her picture, I knew at once this was Tuff."

Tuff seemed to recognize Nikita too. All that summer, whenever she ran into him on the island, she came close and didn't run away.  She also didn't come looking for a handout. She'd learned to survive on her on. Nikita happily watched Tuff growing bigger. When the ice returned that year, she left healthy and strong.


The rest of Tuff's life remains a mystery because Nikita has yet to see her return to Wrangel Island again. He says, "I like to think Tuff's alive and well and raising cubs of her own."

I like to think she is too.   

I'LL READ TO YOU: RACE THE WILD WIND

  Relax and enjoy as I read to you. Click to start RACE THE WILD WIND (Bloomsbury) And enjoy your own copy from Amazon